1. 기초
<!DOCTYPE html>
<html>
<head>
<meta charset="UTF-8">
<title>HTML 2일차 - CSS</title>
<link type="text/css" rel="stylesheet" href="./index11.css">
<style>
.box{
width:400px;
height:40px;
}
</style>
</head>- link 로 html파일에 css파일 연결
- style 태그 : css 2.0 전용 태그
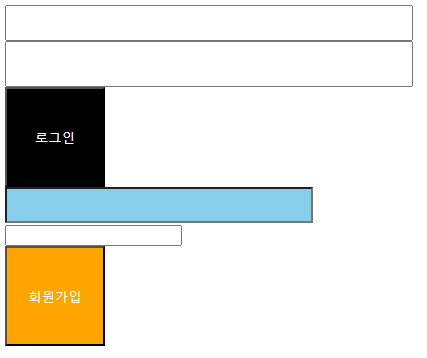
<input type="text" style="width:400px; height:30px;"><br>
<input type="text" class="box"><br>
<input type="button" value="로그인" class="btn"><br>
<input type="password" id="mpass"><br>
<input type="password" id="mpass mpass_orange"><br>
<input type="button" value="회원가입" class="btn btn_orange">- input 속성의 style : css1.0
- 크기 단위 : px, em, rem, vh(브라우저 높이), vw(브라우저 가로크기), %(모바일)
- class : 여러가지 효과를 다양하게 구분하여 사용 가능 //중복 이름 피하기
- id도 style 속성 적용 가능 //id 중복 불가
.btn{
	width:100px;
	height:100px;
	background-color: black;
	color:white;
}
.btn_orange{
	background-color: orange;
}
#mpass{
	background-color: skyblue;
	width: 300px;
	height: 30px;
}
#mpass_orange{
	background-color: orange;
}- css 3.0 형태로 하여 출력하는 구성
- class 이름은 .으로 시작
2. Object 마크업
<!DOCTYPE html>
<html lang="ko">
<head>
<meta charset="UTF-8">
<title>HTML + css 3.0 3일차 - Object 마크업</title>
<link type="text/css" rel="stylesheet" href="./index12.css?v=1">
</head>
- lang 설정하면 웹번역 사용가능 //웬만하면 설정해두기
- 다 잘했는데 적용이 안될때
- .css .jsp .js 해당 소스 코드에 대해 주소 뒤에 ?v=1 를 이용하여 신규 코드로 갱신시켜줌
<div class="box"></div>
<div class="box2"></div>
<div class="box3"></div>
<div class="box4"></div>- div : object (버튼, 레이아웃, 도형, 메뉴)
body{
	margin:0;
	padding:0;
}
.box{
	width:100px;
	height:100px;
	background-color:blue;
}
.box2{
	width:100px;
	height:100px;
	background-color:orange;
	border:2px solid green;
}
.box3{
	width:100px;
	height:100px;
	background-color:pink;
	border-radius:100px;
}
.box4{
	width:200px;
	height:100px;
	background-color:red;
	border-radius:100px 0 100px 0;
}- body{} : body 태그에 적용 (#도 .도 없이)
- 원래 기본으로 여백이 살짝있는데 body에 설정해줘서 딱붙게해줌
- 요즘 모든 웹사이트가 바디에 이렇게 설정
- margin : 바깥쪽 여백
- padding : 안쪽 여백
- background-color : 배경색
- border : 외곽선 (두께, 선종류, 색상)
- 외곽선종류
- solid : 외줄선
- dashed : 절취선, 파선
- dotted : 점선
- double : 이중선 //100%화면일때 적어도 3px은 해야 더블로 보임
- 외곽선종류
- border-radius : 모서리 형태 변경하는 속성 (height 기준) //둥글게
- 네 꼭짓점의 곡률이 같을때 하나만 입력
- 네 꼭짓점의 곡률이 다를때 10시 1시 5시 7시 시계방향으로 설정
- font-size : 폰트의 크기 //범위 자유
- font-weight: bold; : 폰트의 굵기 //bold=bolder 모두 가능
- text-align : 오브젝트 가로 기준 글자 좌우정렬
- line-height : 글자행의 간격 설정

😊응용문제
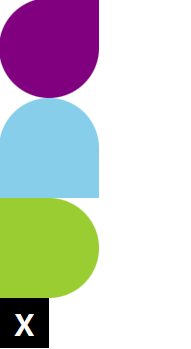
<div class="obj1"></div>
<div class="obj2"></div>
<div class="obj3"></div>

<div class="close">X</div>
.obj1{
width: 100px;
height: 100px;
background-color: purple;
border-radius: 50px 0 50px 50px; /* 높이 기준이기 때문에 50%로 써도됨 */
}
.obj2{
width: 100px;
height: 100px;
background-color: skyblue;
border-radius: 50px 50px 0 0;
}
.obj3{
width: 100px;
height: 100px;
background-color: yellowgreen;
border-radius: 0 50px 50px 0;
}
.close{
width:50px;
height:50px;
background-color: black;
color:white;
font-size:30px;
font-weight: bold;
text-align: center;
line-height: 50px;
}
.close:hover{
background-color: red;
color:yellow;
}- :hover (속성) : 마우스 포인터가 해당 오브젝트에 있을 경우
3. Object 사용법
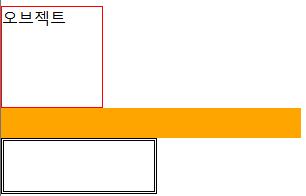
<span class="box">오브젝트</span>
<label class="box2"></label>
<span class="btn"></span>
.box{
display:block;
height: 100px;
border:1px solid red;
}
.box2{
display:block;
width:300px;
height:30px;
background-color: orange;
}
.btn{
display:block;
width:150px;
height:50px;
border:3px double black;
}- div, span : HTML4 태그
- span 태 : display 속성이 적용돼야만 크기 조정이됨 (div는 기본으로 탑재되어있음) //display : block;
- label : HTML5 태그
- label 태그 : span과 동일하게 display 적용해야함
<em class="box3">123456</em>	<!-- em = i 태그 -->
<map></map>
<bdo></bdo>
<bdi></bdi>
<font></font>
<menu></menu>
.box3{
display:block;
width:150px;
height:150px;
background-color: blue;
color:white;
font-style:normal;
}- 빈태그 : em, map, bdo, bdi, font, menu
- em 태그 : i태그와 같은 역할
- display:block; 해야 크기설정 가능
- em태그는 i와 같아서 기울기가 적용되어있어서 안기운상태로 쓰려면 폰트스타일 노말로 설정
- em 태그 : i태그와 같은 역할

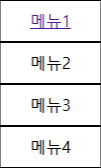
<ul class="ulcss">
<li class="licss"><a href="http://daum.net">메뉴1</a></li>
<li class="licss">메뉴2</li>
<li class="licss">메뉴3</li>
<li class="licss">메뉴4</li>
</ul>
.ulcss{
width:400px;
height:160px;
list-style:none;
margin: 0;
padding:0;
}
.licss{
width:100px;
height:40px;
border:1px solid black;
text-align: center;
line-height: 40px;
}
.licss:hover{
background-color: skyblue;
}- 목차(ol, ul, dl) 태그 => 메뉴로 변경
- height : 부모태그는 자식태그의 높이*갯수
- list-style:none; : 목차 태그에 한해서 목차 형태 삭제 (ul, ol)
<ol class="disc">
<li class="lidisc lidisc2"></li>
<li class="lidisc"></li>
<li class="lidisc"></li>
</ol>
.disc{
width:500px;
height:40px;
list-style: none;
margin:0;
padding:0;
}
.lidisc{
width:30px;
height:30px;
border-radius:30px;
background-color: red;
float:left;
}
.lidisc2{
width:100px;
background-color: black;
}- 이벤트 화면 쪼꼬미들 만들때 사용
- 디스크를 없앨 때 아래 세줄 한세트로 사용
- list-style: none;
margin:0;
padding:0;
- list-style: none;
- float : 오브젝트 정렬 기준 (left, center, right)
- left : 12345
- right : 54321
- center(기본) : 수직으로정렬

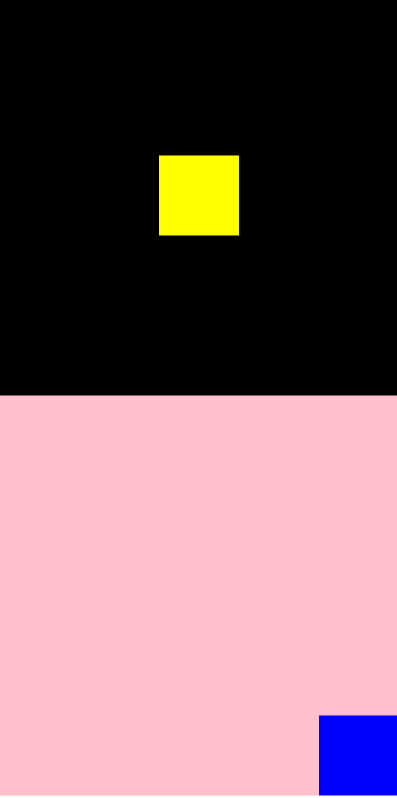
4. Object 위치 변경법
<div class="box">
	<span class="sbox"></span>
</div>
<div class="box2">
	<span class="sbox2"></span>
</div>
.box{ /* 부모태그 */
position:static;
width:500px;
height:500px;
background-color: black;
}
.sbox{ /* 자식태그 */
position:relative;
margin-left:200px;
top:200px;
display:block;
width:100px;
height:100px;
background-color: yellow;
}
.box2{
position: relative;
width:500px;
height:500px;
background-color: pink;
}
.sbox2{
position: absolute;
right:0;
bottom:0;
margin-left:-100px;
display:block;
width:100px;
height:100px;
background-color: blue;
}⭐중요⭐
- position 속성 : 오브젝트의 위치를 변경할 수 있는 옵션
- static : 자신의 위치를 고정시켜서 영역을 출력시키는 형태
- margin으로 이동시킴
- relative : 자신의 위치를 고정 및 반고정 형태로 사용하여 출력시키는 형태
- top, left, margin으로 이동시킴
- absolute : body 기준으로 자유분방하게 영역없이 사용하여 출력시키는 형태
- top, left, right, bottom, margin으로 이동 시킴
- static : 자신의 위치를 고정시켜서 영역을 출력시키는 형태
1. 부모태그가 static일 경우 자식태그는 relative 또는 static일 경우 범위 안에서 조정
2. 부모태그가 relative일 경우 자식태그는 relative 또는 absolute 사용 가능
3. 부모태그가 absolute일 경우 자식태그는 relative 또는 absolute 사용 가능
이외에는 말안들음
😊응용문제

<div class="box">
	<span class="sbox"></span>
	<span class="sbox2"></span>
</div>

<div class="abox">
	<span class="abox2"></span>
</div>
.box{
position: relative;
width:400px;
height:400px;
background-color: blue;
}
.sbox{ /* relative도 가능 top:150px; */
position: absolute;
top:150px;
display:block;
width:100px;
height:100px;
background-color: yellow;
}
.sbox2{
position: absolute;
right:0;
top:150px;
display:block;
width:100px;
height:100px;
background-color: yellow;
}
.abox{
position: relative;
width:400px;
height:400px;
background-color: purple;
margin-left:100px;
margin-top:100px;
}
.abox2{
position: absolute;
top:150px; /* 50%로 해도 됨 */
left:150px;
display:block;
width:100px;
height:100px;
background-color: yellow;
}⭐부모를 밀어도 자식이 의도한 위치에 있어야함
아닐시 대충대충막코드!
5. Object에 대한 padding 사용법
<div class="box">
룰루랄라</div>
<div class="box2">
룰루랄라</div>
.box{
width: 150px;
height: 50px;
background-color: orange;
padding-left: 50px;
padding-top: 50px;
}
.box2{
width:200px;
height:100px;
background-color: pink;
padding-left: 50px;
padding-top: 50px;
box-sizing:border-box;
}- padding : 안쪽 여백
- 안쪽 여백을 적용시 실제 적용한 오브젝트 크기가 더 커질 수 있음
- 크기확인은 웹에서 f12누른후 컨트롤쉬프트c
- box-sizing : padding, border에 적용하여 안쪽 여백에 대한 크기를 별도로 관리할 수 있는 속성
- 아래 박스는 위 box와 다르게 box-sizing을 적용하여 덧셈뺄셈으로 귀찮게 크기 설정 안해도됨

<ul class="menus">
<li>대메뉴1
<ol class="smenus">
<li>소메뉴1</li>
<li>소메뉴2</li>
</ol>
</li>
<li>대메뉴2</li>
<li>대메뉴3
<ol class="smenus">
<li>소메뉴1</li>
<li>소메뉴2</li>
</ol>
</li>
<li>대메뉴4
<ol class="smenus">
<li>소메뉴1</li>
<li>소메뉴2</li>
</ol>
</li>
</ul>
.menus{
width:calc(100px*4); /* calc() : 계산식을 지정할 수 있는 css전용함수 */
height: 40px;
list-style: none;
margin:0;
padding:0;
}
.menus > li{
width:100px;
height:40px;
border:1px solid black;
float:left;
text-align: center;
line-height: 40px;
box-sizing:border-box;
}
.smenus{ /* ol */
display:none; /* 해당 오브젝트를 숨김 : display:none; */
width:inherit; /* inherit : 상속 */
height: calc(40px*2);
border: 1px solid black;
list-style: none;
margin:0;
padding:0;
box-sizing:border-box;
}
.smenus >li{
width:inherit;
height: 40px;
border: 1px solid black;
box-sizing:border-box;
}
.menus >li:hover{
background-color: yellow;
}
.menus >li:hover .smenus{
display: block;
}⭐border적용시 border만큼 height, width 증가 => 부모보다 길이가 커지면 깨짐 => box-sizing 설정

6. Moblie 전용 interface 태그
- pc : 12px 기본 형태의 폰트 크기
- mobile : 14px~16px 기본 형태의 폰트 크기
<html lang="ko">
<head>
<meta charset="UTF-8">
<meta name="viewport" content="width=device-width, initial-scale=1">
<title>HTML - Mobile 전용 웹페이지</title>
<link type="text/css" rel="stylesheet" href="./index17.css?v=4">
</head>- viewport : 사용자가 접속한 device 화면
- width=device-width : 접속한 device의 가로 크기
- initial-scale : 확대 기준 (기본 1.0으로 잡기)
<p>모바일 전용 interface 태그</p>
<input type="number"><br>
<input type="tel"><br>
<input type="color"><br>
<input type="date"><br>
<input type="time"><br>
<input type="datetime-local"><br>
<input type="week"><br>
<input type="email"><br>
<input type="url"><br>- number : 숫자만 입력(Mobile전용) - ios에서는 인식이 안됨
- tel : 숫자 전화번호를 입력받을 경우 사용하는 속성(Mobile) //pc는 의미없음 text와 같음
- color : 색상을 선택하는 속성값 (Pc, Mobile)
- date : 날짜를 선택하는 속성값 (Pc, Mobile)
- time : 시간을 선택하는 속성 (Pc, Mobile)
- datetime-local : 날짜+시간을 선택하는 속성(Pc, Mobile)
- week : 주일표시(주차) (Pc, Mobile) ios는 사용불가능
- email : 이메일 (Mobile) - 안드로이드에서 한글 입력 불가 -> 한글도메인사용불가
- url : URL (Mobile) - 안드로이드에서 한글 입력 불가 -> 한글도메인사용불가

<form oninput="aa.value=parseInt(a.value)">
숫자 : 1<input type="range" min="1" max="10" id="a">10
<br><br>

선택한 숫자 : <output for="a" name="aa"></output>
</form>

대리운전 : <a href="tel:1588-1588">1588-1588</a>
<br><br>

<input inputmode="one-time-code">
<input autocomplete="one-time-code">- range : 범위선택 속성(Pc, Mobile) - min, max 속성을 구분
- range는 form과 output태그와 함께 적용하여 사용하는 속성값
- output 태그 : input에 입력된 값을 출력시키는 역할을 하는 태그
- a태그 중 href값에 tel 속성을 입력시키면 모바일에서 전화 디바이스로 전환
- one-time-code : SMS문자로 인증코드 발송시 자동으로 인증번호 값이 입력되는 기능(Mobile)

주저리주저리
집에서 모바일로 할때
방에 피씨가 있어서 아이피 공유기가 있고 거실에도 있다
두세개있을때 같은 공유기로 해야함 모바일과 피씨
드롭메뉴 : 호버링시 밑으로 주르륵
슬라이드메뉴 : 호버링시 옆으로 주르륵
팝메뉴 : 호버링시 전체메뉴 주르륵 //뒤에 시커먼거 깔린다면 무적권 팝메뉴
스텝메뉴 : 쿠팡메뉴같은거
프로젝트 우클릭 프로퍼티즈
웹프로젝트셋팅즈
경로 /로 변경
서버중지
서버 애드엔리무브
있던거 왼쪽으로 빼기
html파일에서 컨트롤 f11해서 다시 넣기
그러면
http://localhost:8080/basic_html/index17.html 로 쓰던거
http://localhost:8080/index17.html 로 사용가능